 by
by Introduction
With the increasing number of cyber threats, securing your website has become more important than ever. Cloudflare is a popular service that not only provides content delivery network (CDN) services, but also offers security features to protect your website. In this blog post, we will guide you through the process of adding your website to Cloudflare in 2023 and securing it with their powerful tools.
Step 1: Sign Up for a Cloudflare Account
First, you’ll need to create a Cloudflare account. Go to https://www.cloudflare.com/ and click on “Sign Up.” Fill out the registration form with your email address and a strong password, then click “Create Account.”
Step 2: Add Your Website
After you have created your Cloudflare account, you’ll be prompted to add your website. Enter your domain name (e.g., example.com) and click “Add Site.” Cloudflare will then scan your site’s DNS records, which may take a few moments.
Step 3: Choose a Plan
Once the scanning process is complete, you’ll be presented with several plan options. For most websites, the free plan should suffice. However, if you need more advanced features, you can choose from the paid plans. Select the plan that best suits your needs and click “Confirm Plan.”
Step 4: Review Your DNS Records
Cloudflare will display your current DNS records. Review them carefully and ensure that all necessary records, such as A, AAAA, CNAME, and MX records, are present. If you need to make any changes, you can do so by clicking the “Edit” button next to the respective record. Once you’ve confirmed that your DNS records are accurate, click “Continue.”
Step 5: Update Your Nameservers
To use Cloudflare, you need to update your domain’s nameservers. Cloudflare will provide you with two nameservers that you should use to replace your current ones. Log in to your domain registrar’s control panel (e.g., GoDaddy, Namecheap, etc.) and locate the section where you can update your nameservers. Replace the existing nameservers with the ones provided by Cloudflare, then click “Save” or “Update.”
Step 6: Enable SSL/TLS
After updating your nameservers, you should enable SSL/TLS to secure your site with HTTPS. In your Cloudflare dashboard, go to the “SSL/TLS” tab and select the “Flexible” or “Full” SSL/TLS mode. If your server already has an SSL certificate, choose “Full.” Otherwise, select “Flexible.” This will encrypt the connection between your website visitors and Cloudflare.
Step 7: Configure Security Settings
Now it’s time to secure your website using Cloudflare’s security features. Here are some recommendations:
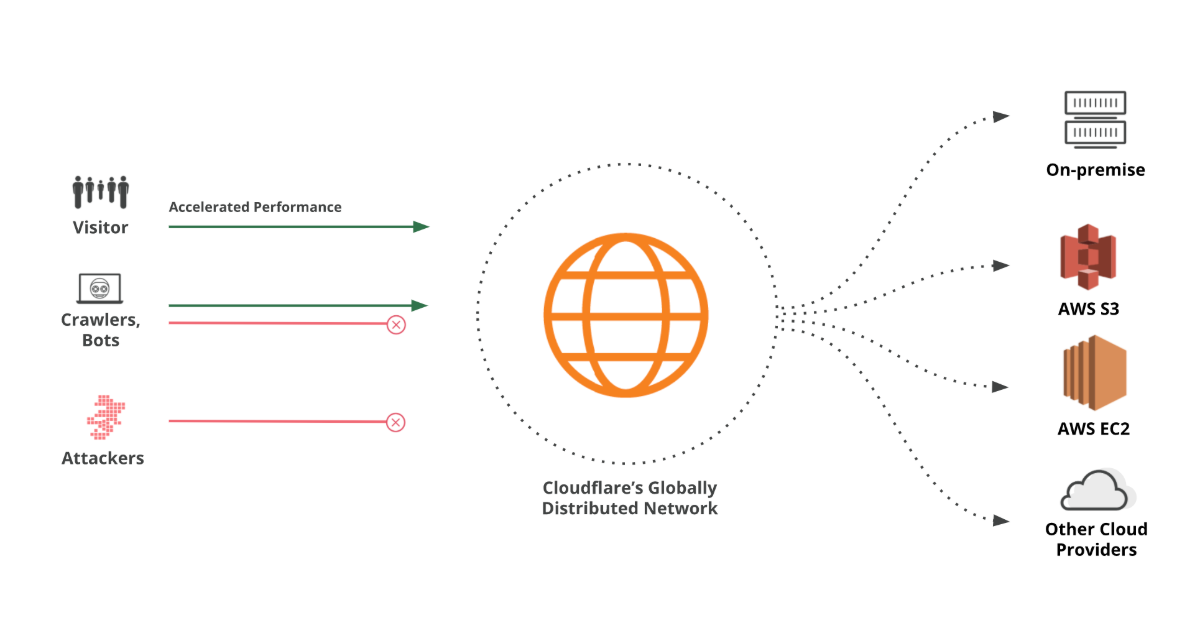
- Firewall Rules: Navigate to the “Firewall” tab and create custom firewall rules to block malicious traffic or specific IP addresses.
- Security Level: Set the security level to “Medium” or “High” to protect your site from threats such as DDoS attacks and SQL injections.
- Bot Fight Mode: Enable “Bot Fight Mode” to protect your website from automated threats and abusive bots.
- Enable “Hotlink Protection” to prevent other websites from directly linking to your images and consuming your bandwidth.
- Enable “Always Use HTTPS” to ensure all visitors access your website using a secure HTTPS connection.
Step 8: Test Your Website
After completing the steps above, allow some time for the DNS changes to propagate (it can take up to 24 hours). Then, visit your website to ensure that it is loading correctly and displaying the “lock” symbol in the address bar, indicating a secure HTTPS connection.
Step 9: Monitor and Optimize Your Website
Now that your website is secured with Cloudflare, it’s essential to monitor its performance and optimize it further. Cloudflare provides various tools and features to help you with this:
- Analytics: Keep track of your website’s traffic, performance, and security by regularly checking the “Analytics” tab in your Cloudflare dashboard.
- Caching: Improve your website’s load times by configuring caching settings. Go to the “Caching” tab and adjust the “Browser Cache Expiration” and “Caching Level” settings as needed.
- Speed: Optimize your website’s speed with features like “Auto Minify,” which compresses your HTML, CSS, and JavaScript files, and “Rocket Loader,” which improves the loading of JavaScript files. These options can be found under the “Speed” tab in your Cloudflare dashboard.
- Workers: For advanced users, Cloudflare Workers allows you to run serverless functions on Cloudflare’s network, providing additional customization and optimization possibilities.
Conclusion
Adding your website to Cloudflare and securing it with their powerful tools is an effective way to enhance your site’s performance and protect it from online threats. By following the steps outlined in this blog post, you can ensure that your website is safe and accessible to users around the world. Stay proactive in monitoring and optimizing your site to deliver the best experience possible for your visitors.