 by
by
Introduction
Are you ready to take your business online but don’t know where to start? Building a website can seem like an overwhelming task, but with the right tools and guidance, it can be done easily. In this step-by-step guide, we will walk you through the process of creating a professional-looking website using Godaddy Domain and Bluehost Hosting services (for first year, you can get a free domain from Bluehost). Whether you’re starting from scratch or revamping an existing site, our comprehensive guide has got you covered. So grab a cup of coffee and get ready to build your dream website!
Domain and Hosting Overview
Domain names are used to identify one or more IP addresses. For example, the domain name microsoft.com represents about a dozen IP addresses. Domain names are used in URLs to identify particular Web pages. For example, in the URL http://www.adminclub.com/, the domain name is adminclub.com.
Hostnames are used to identify computers on a network. For example, the hostname mycomputer may represent the IP address of that computer on a local network or it may be part of a fully qualified domain name (FQDN) such as mycomputer.example.com that represents it on the Internet at large.
When you register a domain name, you must provide contact information for yourself and your organization including name, mailing address, email address, and sometimes telephone number. This information is made available to anyone who does a WHOIS lookup for your domain name. The process and requirements for registering domains vary from country to country around the world, but most registrars have similar procedures and requirements.
Hosting is the storage space used to store the files that make up your website, and it includes the technology and services needed to make your website accessible over the internet. When you buy a domain name, you also need hosting services to place your website online. Web hosts provide space on a server for your website, email, databases, and other tools for getting your site online. Different types of hosting are available such as Shared Hosting, VPS Hosting, Dedicated Hosting, Cloud Hosting etc.
How to Choose a Domain Name
Choosing a domain name is an important step in building a website. A domain name is the address of your website and will be used to identify your site in search engines. When choosing a domain name, you should consider the following:
- – The relevance of the domain name to your business or website. The domain name should be easy to remember and relate to your business or website.
- – The length of the domain name. A shorter domain name is easier to remember and type.
- – The availability of the domain name. Check to see if the domain name you want is available by using a Domain Name Checker tool.
- – The extension of the domain name. Commonly used extensions are .com, .net, and .org. Choose an extension that is relevant to your business or website.
How to Set Up Your Domain with Bluehost Hosting
1. Go to www.bluehost.com and click “Select” to Select your hosting plan. We recommend the Basic Plan.
2. “Create a new domain” or “Use a domain you own” and click “Next” to continue (You can get a domain for free from bluehost for the first year).
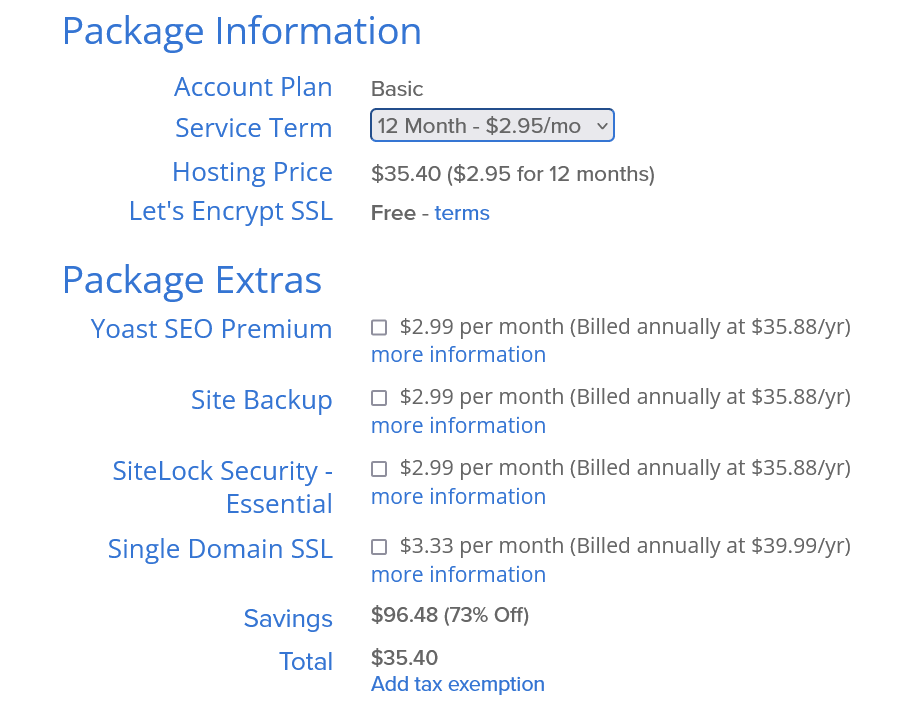
3. Then enter your personal information to “Create your account”. Your final order amount should be $35.4 ($2.95 for 12 months) for the first year – include 1 year basic web hosting plan + 1 domain registration. Remember to exclude the “Package Extras” which are not necessary at all. You can find a free alternative to that feature.
4. Congrats! Your domain is now set up with Bluehost hosting!
How to Install WordPress on Bluehost
If you bought domain also from bluehost, the domain will be automatically set. Here we are assuming you’ve bought your domain name from GoDaddy, you can follow these instructions to install WordPress on Bluehost.
1) Log in to your GoDaddy account and select your domain. Under the “Settings” tab, scroll down to the “Nameservers” section and click the pencil icon.
2) Select “Custom” from the dropdown menu and enter the following nameservers:
NS1.BLUEHOST.COM
NS2.BLUEHOST.COM
3) Save your changes and wait a few minutes for the new nameservers to propagate.
4) In a new browser window, go to www.bluehost.com and click on “Get Started Now”.
5) Select the Basic plan (unless you need more hosting power for some reason). Enter your domain name in the box provided and click “Next”.
6) Fill out your personal information on the next page and click “Submit”.
7) On the next page, you’ll be asked to choose a password for your Bluehost account. Make sure it’s something you’ll remember! Once you’ve chosen a password, scroll down and check the box next to Terms of Service Agreement, then click “Submit”.
8) Congratulations! You’re now officially a Bluehost customer. Scroll down to find your Control Panel login information and write it down somewhere safe. You’ll need it later when we install WordPress.
9) Log in to your Bluehost control panel using the credentials provided in step 8.
10) Scroll down to the “Website Builders” section and click on “Install WordPress”.
11) Enter your domain name in the box provided, then click “Check Domain”. If everything looks good, click “Install Now”.
12) On the next page, choose a username and password for your WordPress site. Make sure they’re something you’ll remember! Once you’ve entered all of the required information, click “Install Now”.
13) You should now see a confirmation that your WordPress installation was successful. Congratulations! You can now log in to your new WordPress site by going to www.yourdomainname.com/wp-admin/.
How to Choose a WordPress Theme
When it comes to WordPress themes, there are literally thousands of options to choose from. So, how do you choose the right one for your website? Here are a few tips:
1. Decide what kind of website you want to build. Are you looking for a simple blog or a more complex website with multiple pages? This will help narrow down your choices.
2. Consider your budget. Some themes can be quite expensive, so be sure to factor this into your decision.
3. Take a look at the features offered by each theme. Some may have more bells and whistles than others, so decide what’s most important to you and your website visitors.
4. Read reviews from other users. This can give you some insight into whether or not a particular theme is easy to use and well-supported by the developer.
5. Test out a few themes before making your final decision. Install them on a test site and see how they look and feel in action. This will help you choose the perfect theme for your needs!
How to Customize Your WordPress Theme
If you’re using a WordPress theme, there are usually two ways to customize it: through the WordPress Customizer or by editing the theme files directly.
The WordPress Customizer is the recommended way to customize your theme. It’s a built-in tool that lets you live preview your changes before publishing them.
To access the Customizer, go to Appearance > Customize in your WordPress admin panel. From here, you can change things like your site title, tagline, colors, and more.
If you want to edit your theme files directly, you can do so from the Appearance > Editor menu item in your WordPress admin panel. However, be aware that any changes you make here will be overwritten when the theme is updated. So if you want to make permanent changes to your theme, it’s best to create a child theme first.
How to Add Content to Your WordPress Site
Assuming you have a WordPress site set up and running on Godaddy Domain and Bluehost Hosting, you can follow the steps below to add content to your site.
1) Log in to your WordPress site.
2) In the left-hand sidebar, navigate to Pages > Add New.
3) Give your page a title and add your content in the WYSIWYG editor.
4) Once you’re happy with your page, click the Publish button to make it live.
5) To add a new blog post, navigate to Posts > Add New in the left-hand sidebar.
6) Again, give your post a title and add your content in the WYSIWYG editor.
7) Select a category for your post from the Categories metabox on the right-hand side.
8) If you wish, you can also add tags to your post.
9) Click the Publish button when you’re ready to make your post live.
Conclusion
Building a website with Godaddy Domain and Bluehost Hosting is an easy process when you have the right information. With this guide, we’ve outlined each step to make it as painless as possible for you. We hope that this article has given you enough knowledge and confidence to start building your own website from scratch. If not, don’t worry – there are plenty of resources available online to help you complete your project successfully. Good luck!

4 thoughts on “Step-by-Step Guide to Building a Website with Bluehost”